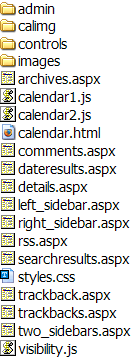
.Blog files at the root level
.Blog is designed for easy installation. The process is very simple, and requires just a few steps to complete. Following this installation guide should allow you to have your new .Blog weblog up and running in just a few minutes. The required steps are as follows:
You will find it helpful to read this entire document before actually beginning the installation process, so that you get a full overview of the process before you begin.
The web.config file is located at the root level of your .blog web site. This is a text file that contains the universal settings for your .Blog weblog. For instance, the pages in your weblog display the weblog name at the top of the page. This name is taken from the information you will put in the web.config file.
Each setting in the web.config file is called a "key", and you will need to edit four of these keys, WebData, BlogName, BlogURL, and RootFilePath.
To begin editing this file, simply open the web.config file in a text editor, such as Notepad.
Near the bottom of the web.config file, you'll see the following block of text that contains the four keys that you must edit:
<add key="WebData" value="Connection String" />
<add key="BlogName" value="Weblog Name" />
<add key="BlogURL" value="http://www.blogname.com/" />
<add key="RootFilePath" value="C:\FilePath\" />
There is only one very important thing to remember, and that is that all key values must be enclosed in quotation marks, as shown in the examples. That means that you cannot use quotation marks anywhere in the values you select to use.
The first line we'll need to edit is the line that says:
<add key="WebData" value="Connection String" />
This is the WebData key. This key contains the information that .Blog needs to connect to the database where your blog entries, comments, etc., will be stored. In order to make this connection, .Blog needs to know the connection information that allows it to transfer data back and forth from your database. This information is called a "connection string". This connection string is usually provided for you by your web host, so if you do not know the connection string, you will have to contact your web host to determine what it is. A sample connection string appears below:
server=sql.hostname.com;uid=UserName;pwd=Password;database=DBName
The connection string contains, as a minimum, the following required bits of data:
When you set up the database through your web host, you will receive all this information. It may be that, for some web hosts, they do not provide you with the actual connection string, but, in the process of creating the SQL database through your web host, you should receive these four bits of information.
When the database is first set up for your web site, it will be empty, but, later on during the installation process, .Blog will automatically create all the database objects, such as tables, that will be required for .Blog to work.
To edit this key, replace the text "Put Connection String Here" with the connection string for your SQL Server database. Even if you do not receive a connection string from your web host, as long as you know the four bits of information above, you can construct the connection string yourself. When you are finished, the WebData key should look something like the example below.
<add key="WebData" value="server=sql.hostname.com;uid=UserName;pwd=Password;database=DBName" />
This key contains the name you have chosen for your blog. Replace the text that says "Weblog Name" with you weblog's name. If you have decided to call your weblog "Daily Notes", then the line must be edited to read:
<add key="BlogName" value="Daily Notes" />
This key contains the main URL you have chosen for your weblog. Replace the text that says "http://www.blogname.com/" with your weblog's URL. If your weblog's URL is "www.dailynotes.com", then the line must be edited to read:
<add key="BlogURL" value="http://www.dailynotes.com/" />
A very important consideration here is to ensure that you leave the trailing slash of your URL intact, so that it reads "http://www.dailynotes.com/". This is because in certain operations when .Blog needs to refer to URLs from your web site, it will need to use the full URL path, and it needs that final slash in the URL to operate properly. If it isn't there, things will break.
Another consideration is what file path to use if you decide to put your weblog in some other location than the root level of your web site. For instance, if you were to put your weblog into a subfolder of the web site's root folder named "blog", then the BlogURL key must be edited to read:
<add key="BlogURL" value="http://www.dailynotes.com/blog/" />
This key contains the actual physical file path for your web site that exists on your web host's server machine. Different web hosts may use different conventions for the file paths they use when setting up web sites, so you will need to contact your web host to find out what convention they use. In many cases, web hosts will place your web site's root folder in the "C:\inetpub" folder. So, if your blog is at "www.dailynotes.com", then the physical file path on your web host's might be "C:\inetpub\dailynotes". If so, you would need to edit the RootFilePath key to read:
<add key="RootFilePath" value="C:\inetpub\dailynotes\" />
Again, it's very important to ensure that you leave the trailing slash of the file path intact, so that it reads "c:\inetpub\dailynotes\", just as you did with the BlogURL key. It's also important to note that file paths must use backward slashes ( \ ) instead of regular slashes like URLs use.
This is the file path that will be used by .Blog when you use the administrative console to upload images and other files to your web site, as explained in the User Guide. Even if you put your blog in a subfolder of your web site, the root file path needs to refer to the actual file path of your web site's root level, not to the folder where you have placed your blog.
Once you have edited these four lines in the web.config file, save and close the file.
.Blog comes with three different template pages from which you can choose you main blog page:
To choose the template you want to use, simply rename the file name of that template to "default.aspx". This will make that page the one that automatically loads when a user directs his browser to the folder where it resides. You will not need to upload the other templates when you upload the files to your web site.
All of the pages in the public portion of your weblog use a Cascading Style Sheet (CSS) named "styles.css". This style sheet provides formatting for all of the weblog's colors, fonts, font sizes, etc. By altering this style sheet, you can customize the look and feel of your blog. The administrative console is also formatted with a CSS file named "admin.css", making it fully customizable as well.
.Blog comes with 5 standard style sheets, examples of which can be seen here. These 5 style sheets are named "BlackandBlue.css", "Plain.css", "Professional.css", "TheBlues.css", and "WWII.css". By default, the "styles.css" stylesheet contains the Plain CSS style. If you wish to choose another style sheet, simply delete the "styles.css" style sheet in the root folder, and change the file name of style sheet you desire to "styles.css".
For information about how to use CSS, should you wish to further customize your style sheet, there is an excellent Beginner-level tutorial at PageResource.com.
If you already have a blog template that you prefer to use, instead of one of the three templates included with .Blog, you can use that template with .Blog. Before doing so, you should have some basic HTML knowledge, and this procedure assumes that you already have the ability to edit HTML code with some confidence.
Because .Blog is created using ASP.NET, all you have to do to use .Blog with another template is to complete the following steps:
1. At the top of the detault templates, you will see these four lines of code at the top of the HTML code for the page:
<%@ Page Language="VB" ContentType="text/html" ResponseEncoding="iso-8859-1" %>
<%@ Register TagPrefix="Dotblog" TagName="blog" Src="controls/blogbody.ascx"%>
<%@ Register TagPrefix="Dotblog" TagName="MostRecent" Src="controls/recent.ascx"%>
<%@ Register TagPrefix="Dotblog" TagName="Blogroll" Src="controls/blogroll.ascx"%>
Copy these four lines of code and paste them into the very top of the HTML code of the page you wish to use for your blog template. The first line of the code tells your web server that the page is an ASP.NET page. The remainin three lines tell your web server where to find the controls that generate the blog, the list of most recent entries, and the blogroll.
2. Once you have placed these four lines of text into the top of your template, each of the three main functions of .Blog are generated by a single ASP.NET HTML tag. For instance, your main blog page is generated by this tag:
<Dotblog:Blog id="Blog" runat="server" />
All you have to do is find the code in your existing template that generates your blog, delete it, and replace it with this HTML tag. When the web server presents this page, it will generate your blog at the location where this HTML tag is located. The Most Recent entry list and the Blogroll work in exactly the same way. Simply replace the code that generates these items in your existing template, and replace them with the appropriate HTML tags.
The tag for the Most Recent Entry list is:
<Dotblog:MostRecent id="Posts" runat="server" />
The tag that generates the blogroll is:
<Dotblog:Blogroll id="Blogs" runat="server" />
Once you have inserted these lines of code into your template, simply save the template with the file extension of ".aspx". You must use the ".aspx" file extension or the template will not work properly.
3. It is important to remember that the blog does use styles from the default .Blog styles. If your template uses a different CSS stylesheet, you must add style definitions for the following styles:
Blog - Contains the overall settings for the weblog's appearance
Blogbody - Contains the style defitions for the entry text.
Date - Defines the style of the date headers
Title - Defines the style for the title of each weblog entry
Sig - Defines the style for the "Posted by" line below the weblog entry title.
You may wish to copy these styles from one of the default stylesheets that ship with .Blog, and paste them into your own stylesheet.
Now, you can put all the .Blog files on your web server. to do this, you must have the ability to FTP files you your web site. Often, your web host will provide a means to FTP files to your web site through a web interface they've created. But if your web site doesn't do this, then you'll need an FTP client like TuCows or RhinoFTP (which can often be obtained for free at download.com), or you must have web design/publishing software like Dreamweaver or FrontPage.
.Blog should unzip with the following files inside the folder into which you unzip it:

.Blog files at the root level
If you are going to put all of these files into the root level of your web site, then you can upload them as is. You do not, however, have to upload the "Documentation" folder, as it only contains your user guides, and is not necessary for .Blog to operate.
Sometimes, however, you might want to have a blog located at some other place than the root level of the web site, perhaps because you have a web site that consists of more than a blog. In that case, there are two important things to remember.

.Blog files in a blog subfolder
Once the files have all been uploaded, you can move to the next step in the installation.
.Blog will automatically create all of the required database objects that it needs to function, as well as setting up the initial user account so that you can log in and begin setting up your blog's administrative functions.
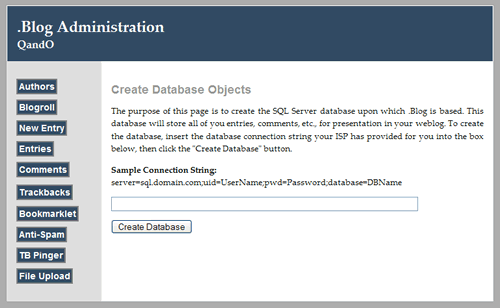
Once you have uploaded the files to your web site, open your web browser. In the admin folder of your web site, there is a page called "database.aspx". This is the page that creates your database objects. So, let's say your web site is "www.website.com", and you've uploaded all the .Blog files into the root level of the web site. In that case, to get to the "database.aspx" page, point your browser to "http://www.website.com/admin/database.aspx". The following page will appear in your browser:

The .Blog Database page
To create the database, insert the connection string for your database (this should be the same as the connection string you used when editing the web.config file previously). Once you have done so, click the "Create Database" button. .Blog should create the database objects for you automatically.
When .Blog creates your weblog database, it also creates a default management account so that you can log in. Since you have not yet logged into your .Blog admin console, you can reach the login page by clicking any of the link buttons on the left side of the Database page. Once you do so, the login page will appear. Log in using the User Name "Administrator" and the password "password". Once you have logged in, you will be taken to the edit page.
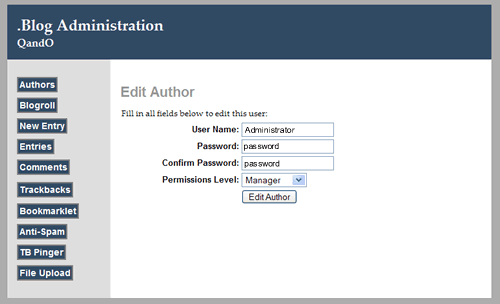
The first thing you must do, however, for important security reasons, is to change the administrative password and user name. Click the "Authors" link button on the left side of the page, and you will be taken to the Authors Administration Page. At the bottom of the page a table will show the Administrator account. Click the "Edit" link to be taken to the Edit Authors Administration Page.

The .Blog Edit Author Page
On this page, change the user name and password. The user name you use will appear as the name under which your posts will be displayed on the blog. Before clicking the "Edit Author" button to save your changes, ensure that you have the "Manager" Permissions Level, in order to ensure you keep full control over your blog. Once you've made the changes, click the "Edit Author" button. Once you do so, your changes will be saved, and, since the Administrator account under which you logged in has now changed, and is no longer valid, you'll be taken back to the login screen.
You can now login under the new user name and password to which you've just changed the Administrator account.
The initial setup of .Blog is now complete.
To learn how to use the administrative console, please refer to the .Blog User Guide.